UIInteraction:iOS中强大的视图交互能力
UIInteraction是iOS开发框架中提供的一个协议,此协议可以为视图增加非常强大的交互能力,例如进行文字的识别和提取,图片的分析、物理按键的拍摄处理等等。本章将总结目前系统提供的遵守了UIInteraction协议的交互类,介绍这些系统交互的使用方法,希望可以对你有所启发,将这些能力应用到具体的业务场景中去。
概览
AVCaptureEventInteraction:相机拍照事件捕获交互(物理按键)。
ImageAnalysisInteraction:为图片添加识别文本,条形码和其他对象的交互。
UIContextMenuInteraction:显示与用户关注点内容相关的菜单交互,例如进行长按时弹出交互菜单。
UIEditMenuInteraction:编辑类菜单交互,主要用在文本输入类的组件上。
UIFindInteraction:进行文本查找与替换的交互。
UILargeContentViewerInteraction:大内容查看交互,例如将某个小组件进行方法查看。
UIFeedbackGenerator:用户交互反击的生成器类,用来统一的处理用户的交互返回(各种震动效果),后续详细介绍。
UIDragInteraction:对组件进行拖拽交互,是可以支持跨应用的。
UIDropInteraction:将组件拖拽放置的交互,是可以支持跨应用的。
UITextInteraction:对自定义的文本组件提供原生体验一致的手势交互,如文本选择。
UITextSelectionDisplayInteraction:选中文本展示的UI交互。
UISpringLoadedInteraction:拖拽时提供动态导航交互,简单说就是当拖转组件到一个元素时,可以动态的触发元素的点击跳转。
UIBandSelectionInteraction:跟踪指针位置选中项目的交互,在有鼠标或其他指针的场景中需要用到此种交互,本文不做探讨。
UIToolTipInteraction:指针悬停在组件上展示提示UI的交互,本文不做讨论。
UIPencilInteraction:Apple Pencil的交互,某些型号的笔可以进行挤压和双击交互,本文不做讨论。
UIIndirectScribbleInteraction:非常规的输入类视图的用户交互,主要是手写跟踪,本文不做讨论。
UIPointerInteraction:定义鼠标指针外观的交互,本文不做讨论。
UIScribbleInteraction:提供涂写交互能力,本文不做讨论。
GCEventInteraction:GameController交互,涉及到GameController框架,这里不做讨论。
BETextInteraction:浏览器文本视图相关交互,涉及到BrowserEngineKit框架,iOS17.4之后支持三方开发浏览器软件,这不再本篇文章的讨论范围
上面所列举出的类都是遵守了UIInteraction类,并提供了相关交互能力。本篇文章主要介绍其中与iPhone设备上应用体验相关的交互,对Vision设备,iPad和Mac等可以手写和处理指针的交互不做过多的讨论。下面我们会逐一对这些交互能力的使用进行介绍。
AVCaptureEventInteraction相机拍照事件捕获交互
在iPhone设备上,系统的相机有一个非常好用的功能,即可以通过按下任意的音量键来执行拍照动作,这也是自拍杆之所以无需点击虚拟拍照按钮就可以控制系统相机拍照的原因。AVCaptureEventInteraction提供了交互接口,可以让用户在自己的应用中实现这一功能。首先AVCaptureEventInteraction提供的本质上是物理按键的监听能力,因此必须要求在应用捕获摄像头的视频流时才能使用。
非常重要:AVCaptureEventInteraction的相关API只能用在相机捕获实时影像的场景中,只有当摄像头正在使用时系统才会正常的发送硬件事件,在后台的应用以及没有使用摄像头的应用都无法接收到这个事件。
示例代码:
import UIKit
import AVKit

class ViewController: UIViewController, AVCaptureVideoDataOutputSampleBufferDelegate {

    /// A capture event interaction to handle hardware button presses.
    private var eventInteraction: AVCaptureEventInteraction!


    var captureSession: AVCaptureSession!
    var videoPreviewLayer: AVCaptureVideoPreviewLayer!

    override func viewDidLoad() {
        super.viewDidLoad()
        view.backgroundColor = .white
        // Configure the app to take a photo on hardware button press.
        configureHardwareInteraction()
        // 设置相机会话
        captureSession = AVCaptureSession()
        captureSession.beginConfiguration()
        captureSession.sessionPreset = .high

        guard let videoDevice = AVCaptureDevice.default(for: .video) else { return }
        guard let videoInput = try? AVCaptureDeviceInput(device: videoDevice) else { return }

        if captureSession.canAddInput(videoInput) {
            captureSession.addInput(videoInput)
        }

        let videoOutput = AVCaptureVideoDataOutput()
        videoOutput.setSampleBufferDelegate(self, queue: DispatchQueue(label: "videoQueue"))
        if captureSession.canAddOutput(videoOutput) {
            captureSession.addOutput(videoOutput)
        }

        captureSession.commitConfiguration()
        captureSession.startRunning()

        // 创建视频预览层
        videoPreviewLayer = AVCaptureVideoPreviewLayer(session: captureSession)
        videoPreviewLayer.frame = view.bounds
        view.layer.addSublayer(videoPreviewLayer)
    }

    override func viewDidLayoutSubviews() {
        super.viewDidLayoutSubviews()
        videoPreviewLayer.frame = view.bounds
    }

    private func configureHardwareInteraction() {
        // 处理硬件事件触发逻辑的逻辑
        // 可以读取当前的视频流进行拍摄
        eventInteraction = AVCaptureEventInteraction { event in
            print("事件阶段状态 - ", event.phase)
        } secondary: { event in
            print("事件阶段状态 - ", event.phase)
        }
        eventInteraction.isEnabled = true
        view.addInteraction(eventInteraction)
    }
}
AVCaptureEventInteraction类的定义本身非常简单:
@available(iOS 17.2, *)
open class AVCaptureEventInteraction : NSObject, UIInteraction {
    // 初始化方法,注册一个事件回调
    public init(handler: @escaping (AVCaptureEvent) -> Void)
    // 初始化方法,注册一个事件回调,回调中的两个参数分别对应音量上和下两个按钮的点击
    public init(primary primaryHandler: @escaping (AVCaptureEvent) -> Void, secondary secondaryHandler: @escaping (AVCaptureEvent) -> Void)
    // 设置此交互行为是否生效
    open var isEnabled: Bool
}
其回调中的AVCaptureEvent会标识事件的状态:
@available(iOS 17.2, *)
open class AVCaptureEvent : NSObject {
    // 事件的状态
    open var phase: AVCaptureEventPhase { get }
}

@available(iOS 17.2, *)
public enum AVCaptureEventPhase : UInt, @unchecked Sendable {
    // 点击开始
    case began = 0
    // 点击结束
    case ended = 1
    // 事件取消
    case cancelled = 2
}
需要注意,所有的AVCaptureEventInteraction接口都在iOS17.2之后可用。
ImageAnalysisInteraction图片识别交互
图片中往往包含了许多标准化的信息,如文本信息,二维码信息等。在使用iOS系统的图库软件时,用户可以直接长按图片来提取图片中的信息,如进行文本的复制,二维码的识别等。ImageAnalysisInteraction类即可提供这种交互能力。
ImageAnalysisInteraction交互有很多应用场景,可以复制图片中的文本,可以快捷拨打电话、翻译、识别链接和二维码等。ImageAnalysisInteraction是基于VersionKit框架实现的,VersionKit是Apple提供的一套与视觉处理相关功能的框架。
需要注意,ImageAnalysisInteraction本身只是提供了一套识别后的用户交互,具体的分析任务是由ImageAnalyzer类实现的。ImageAnalyzer只能在 A12及以上的芯片设备上使用,因此在使用此功能前,需要先做下可用性判断。
ImageAnalysisInteraction的交互官网示例图如下:

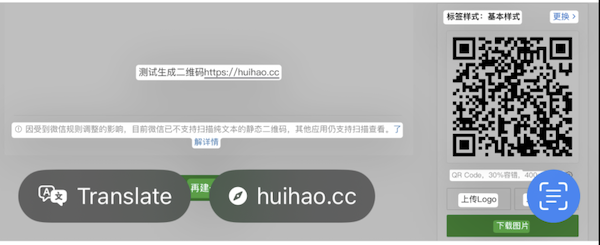
当ImageAnalyzer对图片分析完成后,可以将结果传递给ImageAnalysisInteraction,此时UIImageView的组件的右下角会显示一个扫描样式的图标,单击此图标即可查看分析的结果,图片中会将识别出的元素区域进行高亮,并支持用户操作。
示例代码如下:
import VisionKit
class ViewController: UIViewController, ImageAnalysisInteractionDelegate {

    let interaction = ImageAnalysisInteraction()
    let imageDataAnalyzer = ImageAnalyzer()
    let imageView = UIImageView(image: UIImage(named: "img"))

    override func viewDidLoad() {
        super.viewDidLoad()
        imageView.contentMode = .scaleAspectFit
        view.addSubview(imageView)
        imageView.frame = view.bounds
        if ImageAnalyzer.isSupported {
            imageView.addInteraction(interaction)
            interaction.delegate = self
            // 设置预期接收的交互
            interaction.preferredInteractionTypes = [.automatic]
            Task {
                // 配置 configuration 对象
                let configuration = ImageAnalyzer.Configuration([.text, .machineReadableCode])
                do {
                    // 开始执行分析
                    let analysis = try await imageDataAnalyzer.analyze(imageView.image!, configuration: configuration)
                    // 分析信息结果接收
                    interaction.analysis = analysis
                } catch {
                 // 处理异常
                }
            }
        }
    }
}
找一测试图片进行识别,效果如下图所示:
下面,我们再来详细解析下ImageAnalysisInteraction接口的功能,ImageAnalyzer的识别能力本身,这里就不再赘述,
ImageAnalysisInteraction交互可以直接添加在UIImageView上,如果我们不使用UIImageView组件来展示图片,也可以手动设置图片渲染的区域,ImageAnalysisInteraction会将交互内容映射到对应组件的正确位置上。
ImageAnalysisInteraction类中的核心属性和方法如下:
@available(iOS 16.0, macCatalyst 17.0, *)
@MainActor @objc final public class ImageAnalysisInteraction : NSObject, UIInteraction {
    // 设置代理
    @MainActor weak final public var delegate: (any ImageAnalysisInteractionDelegate)?
    // 图片分析的结果,分析完成后对此属性进行赋值
    @MainActor final public var analysis: ImageAnalysis?
    // 设置期望支持的交互的类型
    @MainActor final public var preferredInteractionTypes: ImageAnalysisInteraction.InteractionTypes
    // 目前所激活的交互类型
    @MainActor final public var activeInteractionTypes: ImageAnalysisInteraction.InteractionTypes { get }
    // 可选择的元素是否高亮,内部会自己管理此属性的值
    @MainActor final public var selectableItemsHighlighted: Bool
    // 是否有激活被选中的文本
    @MainActor final public var hasActiveTextSelection: Bool { get }
    // 清空所有选中的文本
    @MainActor final public func resetTextSelection()
    // 图片中的文本
    @MainActor final public var text: String { get }
    // 被选中的文本
    @MainActor final public var selectedText: String { get }
    // 选中的文本的attribute属性
    @MainActor final public var selectedAttributedText: AttributedString { get }
    // 选中的文本的范围
    @MainActor final public var selectedRanges: [Range<String.Index>]
    // 当不使用UIImageView来展示图片时,图片的渲染区域如果有修改,需要调用此方法通知交互层来对应的更新
    @MainActor final public func setContentsRectNeedsUpdate()
    // 单位空间内的描述交互区域的矩形
    @MainActor final public var contentsRect: CGRect { get }
    // 视图的某个位置是否有可交互元素
    @MainActor final public func hasInteractiveItem(at point: CGPoint) -> Bool
    // 视图的某个位置是否有文本
    @MainActor final public func hasText(at point: CGPoint) -> Bool
    // 视图的某个位置是否有检测到数据
    @MainActor final public func hasDataDetector(at point: CGPoint) -> Bool
    // 实时文本按钮是否可见,右下角的按钮
    @MainActor final public var liveTextButtonVisible: Bool { get }
    // 识别出的所有主题的集合
    @MainActor final public var subjects: Set<ImageAnalysisInteraction.Subject> { get async }
    // 高亮的主题集合
    @MainActor final public var highlightedSubjects: Set<ImageAnalysisInteraction.Subject>
}
通过InteractionTypes可以设置预期支持的交互类型以及可以获取到最终识别出的交互类型,此类型定义如下:
public struct InteractionTypes : OptionSet {
    // 自动,支持任意类型
    public static let automatic: ImageAnalysisInteraction.InteractionTypes
    // 文本类的所有类型
    public static let automaticTextOnly: ImageAnalysisInteraction.InteractionTypes
    // 文本选择类,包括选中,拷贝和翻译
    public static let textSelection: ImageAnalysisInteraction.InteractionTypes
    // 数据类,包括链接,邮箱,地址
    public static let dataDetectors: ImageAnalysisInteraction.InteractionTypes
    // 图片主题类,包括抠图等
    public static let imageSubject: ImageAnalysisInteraction.InteractionTypes
    // 支持更多的图片选项,如图片的分类
    public static let visualLookUp: ImageAnalysisInteraction.InteractionTypes
}
开发者也可以参与到交互的流程中,通过ImageAnalysisInteractionDelegate协议可以更精细化的控制交互行为:
@available(iOS 16.0, macCatalyst 17.0, *)
public protocol ImageAnalysisInteractionDelegate : AnyObject {
    // 返回一个布尔值,可以控制某个位置是否允许交互
    func interaction(_ interaction: ImageAnalysisInteraction, shouldBeginAt point: CGPoint, for interactionType: ImageAnalysisInteraction.InteractionTypes) -> Bool
    // 对于非UIImageView的组件,此代理可以返回一个渲染区域,用来告诉交互层要渲染的位置
    func contentsRect(for interaction: ImageAnalysisInteraction) -> CGRect
    // 自定义设置用来渲染图片的视图
    func contentView(for interaction: ImageAnalysisInteraction) -> UIView?
    // 设置一个视图控制器用来承接可交互元素的弹出跳转,默认为Window的根视图
    func presentingViewController(for interaction: ImageAnalysisInteraction) -> UIViewController?
    // 当实时文本的可见性变化时会回调
    func interaction(_ interaction: ImageAnalysisInteraction, liveTextButtonDidChangeToVisible visible: Bool)
    // 选中的高亮元素变化时回调
    func interaction(_ interaction: ImageAnalysisInteraction, highlightSelectedItemsDidChange highlightSelectedItems: Bool)
    // 选中的文本变化时回调
    func textSelectionDidChange(_ interaction: ImageAnalysisInteraction)
}
UIContextMenuInteraction上下文菜单交互
当我们在系统的浏览器中对某个链接触发3D Touch或长按操作时,可以看到会在当前页面弹出一个浮层,浮层会对超链接进行预览展示,并提供一些操作菜单项。这其实就是UIContextMenuInteraction提供的交互能力。
UIContextMenuInteraction可以为某个可交互控件提供浮层预览和菜单能力。
先来看一个示例:
class ViewController: UIViewController, UIContextMenuInteractionDelegate {
    func contextMenuInteraction(_ interaction: UIContextMenuInteraction, configurationForMenuAtLocation location: CGPoint) -> UIContextMenuConfiguration? {
        return .init(identifier: nil) {
            // 设置预览控制器,返回空则不展示额外的预览
            nil
        } actionProvider: { elements in
            // 设置菜单项
            let favoriteAction = UIAction(title: "喜欢", image: UIImage(systemName: "heart.fill"), state: .off) { (action) in
                }
            let shareAction = UIAction(title: "分享", image: UIImage(systemName: "square.and.arrow.up.fill"), state: .off) { (action) in

            }
            let deleteAction = UIAction(title: "删除", image: UIImage(systemName: "trash.fill"),
                                        attributes: [.destructive], state: .on) { (action) in

            }
            return UIMenu(title: "菜单", children: [favoriteAction, shareAction, deleteAction])
        }
    }


    let imageView = UIImageView(image: UIImage(named: "img"))

    override func viewDidLoad() {
        super.viewDidLoad()
        imageView.isUserInteractionEnabled = true
        imageView.contentMode = .scaleAspectFill
        view.addSubview(imageView)
        imageView.frame = CGRect(x: view.frame.width / 2 - 150, y: view.frame.height / 2 - 150, width: 300.0, height: 300.0)
        let interaction = UIContextMenuInteraction(delegate: self)
        // 为图片控件添加UIContextMenuInteraction交互
        imageView.addInteraction(interaction)
    }
}
运行代码效果如下图所示:

在代码配置中,并没有设置预览控制器,因此其触发UIContextMenuInteraction交互时,会将原组件进行高亮,并将其他背景进行模糊。需要注意,UIContextMenuInteraction交互需要在iOS13及以上系统重使用。UIContextMenuInteraction本身比较简单,定义如下:
@available(iOS 13.0, *)
@MainActor open class UIContextMenuInteraction : NSObject, UIInteraction {
    // 代理
    weak open var delegate: (any UIContextMenuInteractionDelegate)? { get }
    // 菜单当前是否正在展示
    @available(iOS 14.0, *)
    open var menuAppearance: UIContextMenuInteraction.appearance { get }
    // 初始化方法
    public init(delegate: any UIContextMenuInteractionDelegate)
    // 这是一个抽象方法,子类可以重写,从而控制菜单弹出的位置
    open func location(in view: UIView?) -> CGPoint
    // 这是一个抽象方法,更新菜单可见性时会调用
    @available(iOS 14.0, *)
    open func updateVisibleMenu(_ block: (UIMenu) -> UIMenu)
    // 将当前已经显示的菜单隐藏掉
    open func dismissMenu()
}
具体弹出的预览视图和菜单项,需要在代理方法中进行设置,UIContextMenuInteractionDelegate中定义的方法如下:
@available(iOS 13.0, *)
@MainActor public protocol UIContextMenuInteractionDelegate : NSObjectProtocol {
    // 配置菜单和预览项,UIContextMenuConfiguration后面介绍
    func contextMenuInteraction(_ interaction: UIContextMenuInteraction, configurationForMenuAtLocation location: CGPoint) -> UIContextMenuConfiguration?
    @available(iOS 16.0, *)
    // 上下文交互开始时回调
    optional func contextMenuInteraction(_ interaction: UIContextMenuInteraction, configuration: UIContextMenuConfiguration, highlightPreviewForItemWithIdentifier identifier: any NSCopying) -> UITargetedPreview?
    // 上下文交互消失时回调
    @available(iOS 16.0, *)
    optional func contextMenuInteraction(_ interaction: UIContextMenuInteraction, configuration: UIContextMenuConfiguration, dismissalPreviewForItemWithIdentifier identifier: any NSCopying) -> UITargetedPreview?
    // 预览操作开始时回调
    optional func contextMenuInteraction(_ interaction: UIContextMenuInteraction, willPerformPreviewActionForMenuWith configuration: UIContextMenuConfiguration, animator: any UIContextMenuInteractionCommitAnimating)
    // 菜单开始显示时回调
    optional func contextMenuInteraction(_ interaction: UIContextMenuInteraction, willDisplayMenuFor configuration: UIContextMenuConfiguration, animator: (any UIContextMenuInteractionAnimating)?)
    // 交互结束时回调
    optional func contextMenuInteraction(_ interaction: UIContextMenuInteraction, willEndFor configuration: UIContextMenuConfiguration, animator: (any UIContextMenuInteractionAnimating)?)
    // 配置菜单高亮时使用的预览视图
    @available(iOS, introduced: 13.0, deprecated: 16.0)
    optional func contextMenuInteraction(_ interaction: UIContextMenuInteraction, previewForHighlightingMenuWithConfiguration configuration: UIContextMenuConfiguration) -> UITargetedPreview?
    // 配置菜单隐藏时使用的预览视图
    @available(iOS, introduced: 13.0, deprecated: 16.0)
    optional func contextMenuInteraction(_ interaction: UIContextMenuInteraction, previewForDismissingMenuWithConfiguration configuration: UIContextMenuConfiguration) -> UITargetedPreview?
}
其中UIContextMenuConfiguration类用来做具体的交互配置,如下:
@available(iOS 13.0, *)
@MainActor open class UIContextMenuConfiguration : NSObject {
    // 唯一标识
    open var identifier: any NSCopying { get }
    // 一组标识符,标识每个副项
    @available(iOS 16.0, *)
    open var secondaryItemIdentifiers: Set<AnyHashable>
    // 徽章数
    @available(iOS 16.0, *)
    open var badgeCount: Int
    // 排序
    @available(iOS 16.0, *)
    open var preferredMenuElementOrder: UIContextMenuConfiguration.ElementOrder
}

@available(iOS 13.0, tvOS 17.0, *)
extension UIContextMenuConfiguration {
    // 初始化方法,配置预览视图与一组菜单项
    @MainActor public convenience init(identifier: (any NSCopying)? = nil, previewProvider: UIContextMenuContentPreviewProvider? = nil, actionProvider: UIContextMenuActionProvider? = nil)
}
UIEditMenuInteraction编辑类菜单交互
UIEditMenuInteraction是对UIMenuController的一种代替,UIEditMenuInteraction的整体设计架构更加合理,使用也更加直观简单。默认UITextView与UITextField已经集成了UIEditMenuInteraction交互。UIEditMenuInteraction交互用来提供诸如剪切、拷贝、粘贴等编辑选项。
示例如下:
class ViewController: UIViewController, UIEditMenuInteractionDelegate {

    func editMenuInteraction(_ interaction: UIEditMenuInteraction, menuFor configuration: UIEditMenuConfiguration, suggestedActions: [UIMenuElement]) -> UIMenu? {
        // 进行菜单项的配置
        let favorite = UIAction(title: "Favorite") { _ in
            print("favorite")
        }
        let share = UIAction(title: "Share") { _ in
            print("share")
        }
        let delete = UIAction(title: "Delete", attributes: [.destructive]) { _ in
            print("delete")
        }
        return UIMenu(children: [favorite, share, delete])
    }

    let imageView = UIImageView(image: UIImage(named: "img"))
    var interaction: UIEditMenuInteraction!
    override func viewDidLoad() {
        super.viewDidLoad()
        interaction = UIEditMenuInteraction(delegate: self)
        imageView.isUserInteractionEnabled = true
        imageView.layer.masksToBounds = true
        imageView.contentMode = .scaleAspectFill
        view.addSubview(imageView)
        imageView.frame = CGRect(x: view.frame.width / 2 - 150, y: view.frame.height / 2 - 150, width: 300.0, height: 300.0)
        // 为图片控件添加UIEditMenuInteraction交互
        imageView.addInteraction(interaction)
        let longPress = UILongPressGestureRecognizer(target: self, action: #selector(didLongPress(_:)))
        imageView.addGestureRecognizer(longPress)
    }

    @objc func didLongPress(_ recognizer: UIGestureRecognizer) {
        let location = recognizer.location(in: imageView)
        let configuration = UIEditMenuConfiguration(identifier: nil, sourcePoint: location)
        // 使用交互对象弹出菜单
        interaction.presentEditMenu(with: configuration)
    }
}
上面代码中,对UIImageView视图添加了一个长按手势,手势触发时,弹出编辑菜单。效果如下图:

UIEditMenuInteraction类解析如下:
@available(iOS 16.0, *)
@MainActor open class UIEditMenuInteraction : NSObject, UIInteraction {
    // 初始化方法,设置代理
    public init(delegate: (any UIEditMenuInteractionDelegate)?)
    // 弹出编辑菜单
    open func presentEditMenu(with configuration: UIEditMenuConfiguration)
    // 隐藏菜单
    open func dismissMenu()
    // 刷新可见的菜单
    open func reloadVisibleMenu()
    // 刷新可见菜单位置,可以带动画
    open func updateVisibleMenuPosition(animated: Bool)
    // 获取交互点的坐标
    open func location(in view: UIView?) -> CGPoint
}
UIEditMenuInteractionDelegate代理对菜单的数据源进行提供,并有生命周期的相关回调:
@available(iOS 16.0, *)
public protocol UIEditMenuInteractionDelegate : NSObjectProtocol {
    // 配置菜单
    optional func editMenuInteraction(_ interaction: UIEditMenuInteraction, menuFor configuration: UIEditMenuConfiguration, suggestedActions: [UIMenuElement]) -> UIMenu?
    // 配置菜单展示的位置
    optional func editMenuInteraction(_ interaction: UIEditMenuInteraction, targetRectFor configuration: UIEditMenuConfiguration) -> CGRect
    // 交互即将弹出菜单时的回调
    optional func editMenuInteraction(_ interaction: UIEditMenuInteraction, willPresentMenuFor configuration: UIEditMenuConfiguration, animator: any UIEditMenuInteractionAnimating)
    // 交互即将隐藏菜单时的回调
    optional func editMenuInteraction(_ interaction: UIEditMenuInteraction, willDismissMenuFor configuration: UIEditMenuConfiguration, animator: any UIEditMenuInteractionAnimating)
}
UIFindInteraction文本查找替换交互
UIFindInteraction顾名思义,用来进行查找相关的交互,其提供了一个系统的查找面板,可以在文本展示类控件中进行文本的查找或替换操作。默认系统的UITextView,WKWebView与PDFView都集成了此交互,只需要将其isFindInteractionEnabled属性设置为true即可。另外,对于完全自定义的文本渲染类组件,如果要实现此交互,则需要手动实现一个文本查找的协议,这里我们只看下如何使用系统提供的这些类来实现UIFindInteraction交互。
示例代码如下:
class ViewController: UIViewController {
    lazy var textView: UITextView = {
        let textView = UITextView(frame: CGRect(x: 0, y: 200, width: view.bounds.width, height: 600))
        textView.text = """
        UIInteraction是iOS开发框架中提供的一个协议,此协议可以为视图增加非常强大的交互能力,例如进行文字的识别和提取,图片的分析、物理按键的拍摄处理等等。本章将总结目前系统提供的遵守了UIInteraction协议的交互类,介绍这些系统交互的使用方法,希望可以对你有所启发,将这些能力应用到具体的业务场景中去。
        """
        textView.center = view.center
        // 打开UIFindInteraction
        textView.isFindInteractionEnabled = true
        // 添加长按手势
        let longPress = UILongPressGestureRecognizer(target: self, action: #selector(didLongPress))
        textView.addGestureRecognizer(longPress)
        return textView
    }()

    override func viewDidLoad() {
        super.viewDidLoad()
        view.addSubview(textView)
    }

    // MARK: 长按手势响应事件
    @objc func didLongPress(_ recognizer: UIGestureRecognizer) {
        // 弹出查找和替换面板 会弹出键盘
        textView.findInteraction?.presentFindNavigator(showingReplace: true)
    }

    override func touchesBegan(_ touches: Set<UITouch>, with event: UIEvent?) {
        // 退出面板
        textView.findInteraction?.dismissFindNavigator()
    }
}
运行代码,在文本区域长按,效果如下图所示:
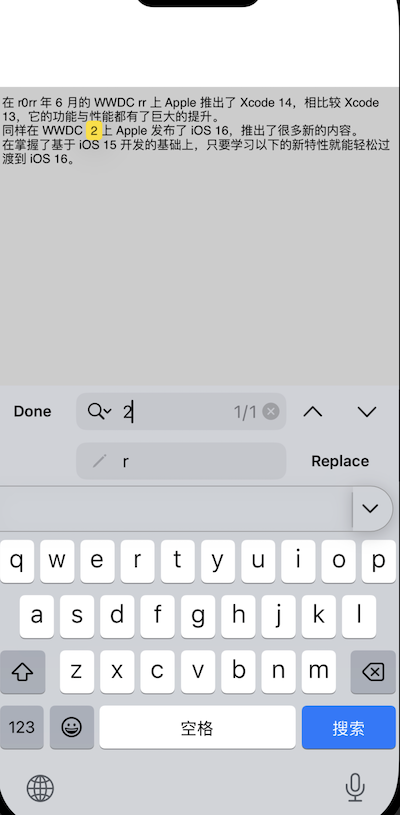
如果进行文本替换,会直接对UITextView中的内容进行修改。UIFindInteraction相对复杂,其中常用属性方法列举如下:
@available(iOS 16.0, *)
@MainActor open class UIFindInteraction : NSObject, UIInteraction {
    // 查找的交互UI是否可见
    open var isFindNavigatorVisible: Bool { get }
    // 当前激活的UIFindSession,UIFindSession具体用来进行管理查找功能
    open var activeFindSession: UIFindSession? { get }
    // 要查找的文本
    open var searchText: String?
    // 替换为的文本
    open var replacementText: String?
    // 可选的菜单
    open var optionsMenuProvider: (([UIMenuElement]) -> UIMenu?)?
    // 代理与初始化方法
    weak open var delegate: (any UIFindInteractionDelegate)? { get }
    public init(sessionDelegate: any UIFindInteractionDelegate)
    // 弹出查找面板,可选是否支持替换
    open func presentFindNavigator(showingReplace: Bool)
    // 隐藏查找面板
    open func dismissFindNavigator()
    // 使用代码查找下一个结果
    open func findNext()
    // 使用代码查找上一个结果
    open func findPrevious()
    // 更新结果数量
    open func updateResultCount()
}
UIFindInteractionDelegat定义如下:
@available(iOS 16.0, *)
@MainActor public protocol UIFindInteractionDelegate : NSObjectProtocol {
    // 提供UIFindSession对象,管理查找
    func findInteraction(_ interaction: UIFindInteraction, sessionFor view: UIView) -> UIFindSession?
    // 交互开始时的回调
    optional func findInteraction(_ interaction: UIFindInteraction, didBegin session: UIFindSession)
    // 交互结束时的回调
    optional func findInteraction(_ interaction: UIFindInteraction, didEnd session: UIFindSession)
}
其中UIFindSession一般无需我们单独实现,如果使用的文本组件非上述的三种,则需要手动实现UIFindSession功能。
UILargeContentViewerInteraction大内容查看交互
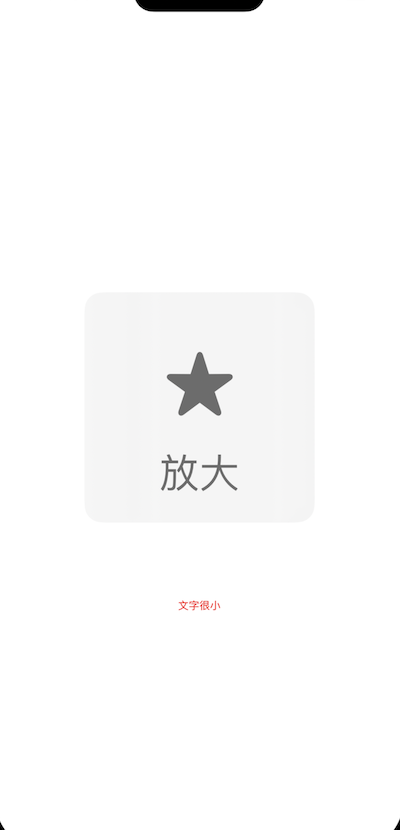
UILargeContentViewerInteraction会用在无障碍相关的功能中,iOS设备会为视觉障碍用户提供无障碍功能,在系统的设置中可以使用放大字体,如此设置后,即可对动态大小的字体进行放大,但是动态字体的放大功能并非会作用于所有的元素,在某些元素上动态字体功能是不生效的,例如导航栏上的文字、TabBar栏上的文字等,针对这种场景,我们可以对某些视图设置UILargeContentViewerInteraction交互,在开启动态放大字体功能时,设置了UILargeContentViewerInteraction的组件产生用户行为时,会显示一个大的内容面板,此面板上的图标和文案可以提示用户此按钮的功能。
示例如下:
class ViewController: UIViewController, UILargeContentViewerInteractionDelegate {

    override func viewDidLoad() {
        super.viewDidLoad()
        let l = UIButton(type: .system)
        l.titleLabel?.font = .systemFont(ofSize: 10)
        l.setTitle("文字很小", for: .normal)
        l.setTitleColor(.red, for: .normal)
        l.frame = CGRect(x: view.frame.width / 2 - 50.0, y: 600, width: 100, height: 30)
        view.addSubview(l)
        // 设置开启大内容交互,以及要显示的内容和图标
        l.showsLargeContentViewer = true
        l.largeContentTitle = "放大"
        l.largeContentImage = UIImage(systemName: "star.fill")
        // 直接添加交互即可
        l.addInteraction(UILargeContentViewerInteraction(delegate: self))
    }

}
UILargeContentViewerInteraction的使用非常简单:
1. 对需要的组件开启showsLargeContentViewer属性
2. 对要展示的大内容标题和图片进行设置
3. 为对应组件添加UILargeContentViewerInteraction交互
showsLargeContentViewer属性实际上是UILargeContentViewerItem协议中约定的,协议如下:
extension UIView : UILargeContentViewerItem {
    // 是否要开启大内容展示功能
    open var showsLargeContentViewer: Bool
    // 设置标题
    open var largeContentTitle: String?
    // 设置图片
    open var largeContentImage: UIImage?
    // 设置图片是否缩放
    open var scalesLargeContentImage: Bool
    // 设置图片边距
    open var largeContentImageInsets: UIEdgeInsets
}
UIView类默认实现了UILargeContentViewerItem协议,因此理论上所有UIView的子类都可以直接使用UILargeContentViewerInteraction交互。
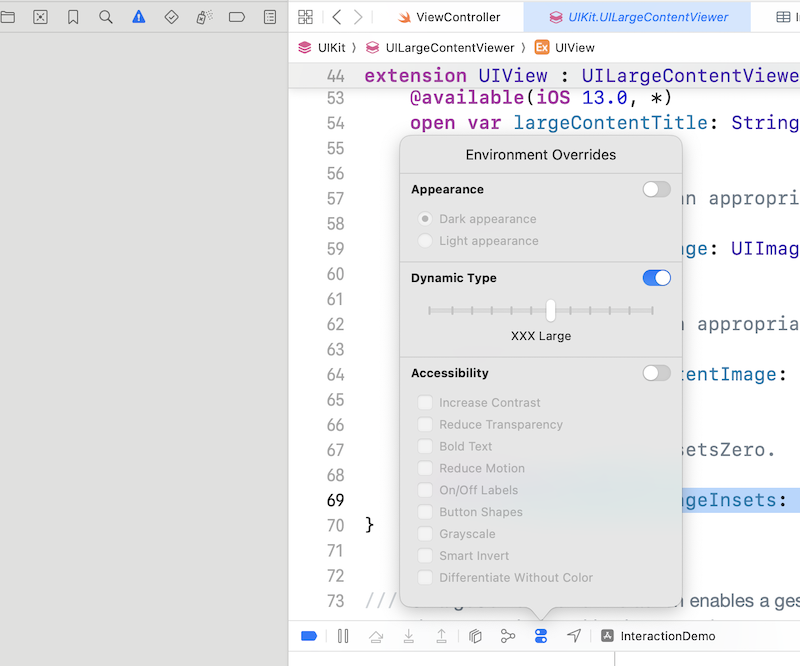
要对UILargeContentViewerInteraction进行测试也很简单,我们可以在真机上开启无障碍来进行测试,也可以在模拟器上运行,在Debug时对环境进行覆盖,选择动态字体,如下图:
此时,在模拟器中对示例的按钮进行按住不放,即可看到大内容面板的展示效果,如下:
UILargeContentViewerInteractionDelegate协议中定义了大内容面板展示的相关生命周期,如下:
@available(iOS 13.0, *)
@MainActor public protocol UILargeContentViewerInteractionDelegate : NSObjectProtocol {
    // 大内容交互手势结束时回调
    optional func largeContentViewerInteraction(_ interaction: UILargeContentViewerInteraction, didEndOn item: (any UILargeContentViewerItem)?, at point: CGPoint)
    // 出发交互时的位置回调,可以返回一个实现了UILargeContentViewerItem的对象
    optional func largeContentViewerInteraction(_ interaction: UILargeContentViewerInteraction, itemAt point: CGPoint) -> (any UILargeContentViewerItem)?
    // 设置要展示大内容面板的controller
    optional func viewController(for interaction: UILargeContentViewerInteraction) -> UIViewController
}
UIFeedbackGenerator用户触感反馈交互
UIFeedbackGenerator是iOS系统提供的一套触感反馈,其预定义了一些震动模式,开发者可以在不同的场景触发不同的触感反馈,增强用户的使用体验。
需要注意,UIFeedbackGenerator是一个抽象类,我们不能对它直接进行实例化使用,也不可以自定义其子类。系统预置了几种震动模式的子类:
1. UIImpactFeedbackGenerator
撞击类反馈,例如用户界面发生碰撞、卡槽入位等场景可以使用。
2. UISelectionFeedbackGenerator
选中反馈,例如选择器选项的更改。
3. UINotificationFeedbackGenerator
通知反馈,收到通知产生反馈。
4. UICanvasFeedbackGenerator
画布的反馈,如参考线和标尺的到位等。
这几种子类的解析如下:
@MainActor open class UIImpactFeedbackGenerator : UIFeedbackGenerator {
    // 反馈类型 强度不同
    public enum FeedbackStyle : Int, @unchecked Sendable {
        case light = 0
        case medium = 1
        case heavy = 2
        @available(iOS 13.0, *)
        case soft = 3
        @available(iOS 13.0, *)
        case rigid = 4
    }
    // 初始化方法
    public convenience init(style: UIImpactFeedbackGenerator.FeedbackStyle, view: UIView)
    public init(style: UIImpactFeedbackGenerator.FeedbackStyle)
    // 触发反馈
    open func impactOccurred()
    open func impactOccurred(at location: CGPoint)
    open func impactOccurred(intensity: CGFloat)
    open func impactOccurred(intensity: CGFloat, at location: CGPoint)
}


@MainActor open class UISelectionFeedbackGenerator : UIFeedbackGenerator {
    // 触发反馈
    open func selectionChanged()
    open func selectionChanged(at location: CGPoint)
}

@MainActor open class UINotificationFeedbackGenerator : UIFeedbackGenerator {
    public enum FeedbackType : Int, @unchecked Sendable {
        case success = 0
        case warning = 1
        case error = 2
    }
    // 触发反馈
    open func notificationOccurred(_ notificationType: UINotificationFeedbackGenerator.FeedbackType)
    open func notificationOccurred(_ notificationType: UINotificationFeedbackGenerator.FeedbackType, at location: CGPoint)
}

@MainActor open class UICanvasFeedbackGenerator : UIFeedbackGenerator {
    // 触发反馈
    open func alignmentOccurred(at location: CGPoint)
    open func pathCompleted(at location: CGPoint)
}
UIDragInteraction与UIDropInteraction拖拽交互
这两个交互分别处理组件的拖拽与放置,其可以在不同的应用程序间实现拖拽传输数据,非常方便。关于这两个交互的用法,在之前的文章中有详细介绍,可以参阅:
https://my.oschina.net/u/2340880/blog/1554045
其他
UITextInteraction与UITextSelectionDisplayInteraction的功能都是对文本编辑类组件添加交互,UITextInteraction可以让自定义的文本输入控件实现类似系统UITextView类似的手势体验。自定义文本编辑组件需要对UITextInput协议进行实现,本身比较复杂,这里不在讨论。另外,与Apple Pencil、带鼠标指针等相关外设的交互功能,也不再继续讨论,有机会后面再聊。最后,感谢你花时间阅读本文,希望能带给你预期的收获。

